OK, somebody gave me VNC to a linux box in the office over VPN, so I can download ISOs. MSDN's sight has a really really bad captcha on it, and using a password manager was a pain, and it did 2-level, but I'm safe now, right?
Anyway, I can now download ISOs onto a machine on the same network as ESX box. Need to figure out how to get ESX to mount the newly created NFS export where the ISO lives.
OK, I figured it out. You create the VM in vSphereClient. Let the boot fail. Then, connect the .iso stored on your data store to the DVD drive. Finally, press Ctrl-Alt-Ins, and it should boot to your ISO.
More later.
Monday, July 7, 2014

Thursday, July 3, 2014
Home lab
Now, it's time to try everything out. The steeplechase machine needs to have firefox binaries and test artifacts. So, let's go get them.
The nightly build artifacts are here. On the steeplechase machine, we need to download both firefox-33.0a1.en-US.linux-x86_64.tar.bz2 and firefox-33.0a1.en-US.linux-x86_64.tests.zip. We will then unpack them appropriately:
We have to have node running on this machine:
We need to start the agent on the two Negatus machines:
Mmm. It looks like I forgot a step. Running server.js should have output something. Looking back on our internal notes, I needed to run this:
If you do that from the simplesignalling directory, it will fail kind of like:
Once you install this correctly, then server.js will output something correctly:
Now, we are ready to try to run steeplechase.
It worked! We have a running lab on Linux now.
Next step: Get Jenkins to invoke this.
The nightly build artifacts are here. On the steeplechase machine, we need to download both firefox-33.0a1.en-US.linux-x86_64.tar.bz2 and firefox-33.0a1.en-US.linux-x86_64.tests.zip. We will then unpack them appropriately:
mkdir firefox-releases
cd firefox-releases
mv ~/Downloads/firefox* .
tar xvfz firefox*.tab.bz2
mkdir tests
cd tests
unzip ../firefox*.zip
We have to have node running on this machine:
mozilla@jenkins-steeplechase:~$ cd simplesignalling/
mozilla@jenkins-steeplechase:~/simplesignalling$ ls
package.json  README.md  server.js
mozilla@jenkins-steeplechase:~/simplesignalling$ nodejs server.js
We need to start the agent on the two Negatus machines:
mozilla@ubuntu:~/src$ cd Negatus/
mozilla@ubuntu:~/src/Negatus$ git pull
Already up-to-date.
mozilla@ubuntu:~/src/Negatus$ ./agent
Command handler listening on 0.0.0.0:20701
Heartbeat handler listening on 0.0.0.0:20700
Query url: IPADDR=0.0.0.0%3A20701&NAME=SUTAgent
No SUTAgent.ini data.
No reboot callback data.
Mmm. It looks like I forgot a step. Running server.js should have output something. Looking back on our internal notes, I needed to run this:
npm install socket.io@0.9.6
If you do that from the simplesignalling directory, it will fail kind of like:
npm ERR! Error: Invalid version: "0.1"
npm ERR!     at Object.module.exports.fixVersionField (/usr/lib/nodejs/normalize-package-data/lib/fixer.js:178:13)
npm ERR!     at /usr/lib/nodejs/normalize-package-data/lib/normalize.js:29:38
npm ERR!     at Array.forEach (native)
npm ERR!     at normalize (/usr/lib/nodejs/normalize-package-data/lib/normalize.js:28:15)
Once you install this correctly, then server.js will output something correctly:
mozilla@jenkins-steeplechase:~/simplesignalling$ nodejs server.js
   info  - socket.io started
Now, we are ready to try to run steeplechase.
mozilla@jenkins-steeplechase:~/steeplechase$ python `pwd`/steeplechase/runsteeplechase.py --binary /home/mozilla/firefox-releases/firefox/firefox --specialpowers-path /home/mozilla/firefox-releases/tests/steeplechase/specialpowers --prefs-file /home/mozilla/firefox-releases/tests/steeplechase/prefs_general.js --signalling-server 'http://172.16.141.51:8080/' --html-manifest /home/mozilla/firefox-releases/tests/steeplechase/tests/steeplechase.ini --host1 172.16.141.52:20701 --host2 172.16.141.53:20701
steeplechase INFO | Pushing app to Client 1...
steeplechase INFO | Pushing app to Client 2...
Writing profile for Client 1...
Pushing profile to Client 1...
cmd: ['/tmp/tests/steeplechase/app/firefox', '-no-remote', '-profile', '/tmp/tests/steeplechase/profile', 'http://172.16.141.51:59367/index.html']
Writing profile for Client 2...
Pushing profile to Client 2...
cmd: ['/tmp/tests/steeplechase/app/firefox', '-no-remote', '-profile', '/tmp/tests/steeplechase/profile', 'http://172.16.141.51:59367/index.html']
steeplechase INFO | Waiting for results...
steeplechase INFO | All clients finished
steeplechase INFO | Result summary:
steeplechase INFO | Passed: 112
steeplechase INFO | Failed: 0
mozilla@jenkins-steeplechase:~/steeplechase$
It worked! We have a running lab on Linux now.
Next step: Get Jenkins to invoke this.
Virtual Center
The ESX server I am installing onto does not have any OS IOS images to use to make VMs. So I need to have them locally. However, I'm in Austin, and the ESX server is in Mt. View. This is not going to work. Somebody at Moz HQ is going to get up a machine I can login via Remote Desktop Connection so I can continue.
Networking home lab setup
Things work much better when you have static IP addresses. This means that your IP addresses won't change when you restart your VMs, which means any command lines you use will remain valid. VMWare Fusion does not make assigning IP addresses easy, but it can certainly be done.
When you created your VMs, they were assigned generated MAC addresses by Fusion. Need to retrieve those here:
Virutal Machine -> Network Adapter -> Network Adapter Settings... Turn down the "Advanced Options" disclosure triangle...

Once you have the Mac addresses for your VMs, you can change your config. One source I drew heavily on is here; you have to restart your network services if VMWare is running. And you have to be careful; Fusion loves to blow away your changes.
On my machine, here is the mapping:
Restart the vmware network.
This article also discusses this issue.
And we can see that all four machines are up and running by pinging them from Terminal on the same machine (they are not visible outside of the Mac):
OK, so next we'll put it all together.
When you created your VMs, they were assigned generated MAC addresses by Fusion. Need to retrieve those here:
Virutal Machine -> Network Adapter -> Network Adapter Settings... Turn down the "Advanced Options" disclosure triangle...
Once you have the Mac addresses for your VMs, you can change your config. One source I drew heavily on is here; you have to restart your network services if VMWare is running. And you have to be careful; Fusion loves to blow away your changes.
On my machine, here is the mapping:
# Configuration file for ISC 2.0 vmnet-dhcpd operating on vmnet8.
#
# This file was automatically generated by the VMware configuration program.
# See Instructions below if you want to modify it.
#
# We set domain-name-servers to make some DHCP clients happy
# (dhclient as configured in SuSE, TurboLinux, etc.).
# We also supply a domain name to make pump (Red Hat 6.x) happy.
#


###### VMNET DHCP Configuration. Start of "DO NOT MODIFY SECTION" #####
# Modification Instructions: This section of the configuration file contains
# information generated by the configuration program. Do not modify this
# section.
# You are free to modify everything else. Also, this section must start
# on a new line
# This file will get backed up with a different name in the same directory
# if this section is edited and you try to configure DHCP again.

# Written at: 05/14/2014 16:13:27
allow unknown-clients;
default-lease-time 1800;                # default is 30 minutes
max-lease-time 7200;                    # default is 2 hours

subnet 172.16.141.0 netmask 255.255.255.0 {
 range 172.16.141.128 172.16.141.254;
 option broadcast-address 172.16.141.255;
 option domain-name-servers 172.16.141.2;
 option domain-name localdomain;
 default-lease-time 1800;                # default is 30 minutes
 max-lease-time 7200;                    # default is 2 hours
 option netbios-name-servers 172.16.141.2;
 option routers 172.16.141.2;
}
host vmnet8 {
 hardware ethernet 00:50:56:C0:00:08;
 fixed-address 172.16.141.1;
 option domain-name-servers 0.0.0.0;
 option domain-name "";
 option routers 0.0.0.0;
}
####### VMNET DHCP Configuration. End of "DO NOT MODIFY SECTION" #######

host jenkins {
        hardware ethernet 00:0c:29:ff:39:df;
        fixed-address 172.16.141.50;
}

host steeplechase {
        hardware ethernet 00:0c:29:5a:8e:75;
        fixed-address 172.16.141.51;
}

host linux64-negatus-01 {
        hardware ethernet 00:0c:29:b7:fe:99;
        fixed-address 172.16.141.52;
}

host linux64-negatus-02 {
        hardware ethernet 00:0c:29:69:b0:0f;
        fixed-address 172.16.141.53;
}
Restart the vmware network.
sudo /Applications/VMware\ Fusion.app/Contents/Library/vmnet-cli --configure
sudo /Applications/VMware\ Fusion.app/Contents/Library/vmnet-cli --stop
sudo /Applications/VMware\ Fusion.app/Contents/Library/vmnet-cli --start
This article also discusses this issue.
And we can see that all four machines are up and running by pinging them from Terminal on the same machine (they are not visible outside of the Mac):
sydpolkzillambp:~ spolk$ ping -c 1 172.16.141.50
PING 172.16.141.50 (172.16.141.50): 56 data bytes
64 bytes from 172.16.141.50: icmp_seq=0 ttl=64 time=0.355 ms

--- 172.16.141.50 ping statistics ---
1 packets transmitted, 1 packets received, 0.0% packet loss
round-trip min/avg/max/stddev = 0.355/0.355/0.355/0.000 ms
sydpolkzillambp:~ spolk$ ping -c 1 172.16.141.51
PING 172.16.141.51 (172.16.141.51): 56 data bytes
64 bytes from 172.16.141.51: icmp_seq=0 ttl=64 time=0.263 ms

--- 172.16.141.51 ping statistics ---
1 packets transmitted, 1 packets received, 0.0% packet loss
round-trip min/avg/max/stddev = 0.263/0.263/0.263/0.000 ms
sydpolkzillambp:~ spolk$ ping -c 1 172.16.141.52
PING 172.16.141.52 (172.16.141.52): 56 data bytes
64 bytes from 172.16.141.52: icmp_seq=0 ttl=64 time=0.338 ms

--- 172.16.141.52 ping statistics ---
1 packets transmitted, 1 packets received, 0.0% packet loss
round-trip min/avg/max/stddev = 0.338/0.338/0.338/0.000 ms
sydpolkzillambp:~ spolk$ ping -c 1 172.16.141.53
PING 172.16.141.53 (172.16.141.53): 56 data bytes
64 bytes from 172.16.141.53: icmp_seq=0 ttl=64 time=0.331 ms

--- 172.16.141.53 ping statistics ---
1 packets transmitted, 1 packets received, 0.0% packet loss
round-trip min/avg/max/stddev = 0.331/0.331/0.331/0.000 ms
sydpolkzillambp:~ spolk$
OK, so next we'll put it all together.
Tuesday, July 1, 2014
Installing Virtual Center
Actually, the first I install on a new VM is Firefox. Duh.
Once that is done, I went to the IP address of the ESX machine. It gives you the option of installing vSphere Client, which is what we will use here.
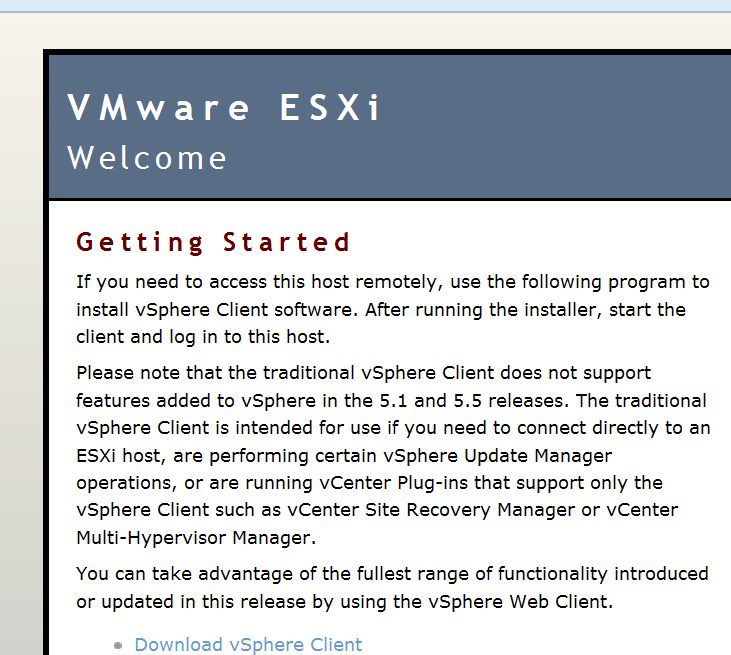
I downloaded and installed it. Great.
Where are the ISOs to install VMs with. Checking with coworker...
Once that is done, I went to the IP address of the ESX machine. It gives you the option of installing vSphere Client, which is what we will use here.
I downloaded and installed it. Great.
Where are the ISOs to install VMs with. Checking with coworker...
After updating stuff
The Linux machines running Negatus need these packages:
You can then clone it, build it, and run it:
When you run the agent, it looks like this:
That's great. Ctrl-C to quit, shutdown the VM, copy or clone it, and then launch both agents. Next task: Networking
sudo apt-get install git g++ libnspr4-dev
You can then clone it, build it, and run it:
mkdir src
cd src
git clone https://github.com/mozilla/Negatus
cd Negatus
make -f Makefile.linux
./agent
When you run the agent, it looks like this:
%  ./agent
Command handler listening on 0.0.0.0:20701
Heartbeat handler listening on 0.0.0.0:20700
Query url: IPADDR=0.0.0.0%3A20701&NAME=SUTAgent
No SUTAgent.ini data.
No reboot callback data.
That's great. Ctrl-C to quit, shutdown the VM, copy or clone it, and then launch both agents. Next task: Networking
Back to lab building
Doing two things at once:
- Starting to pay with an ESX server a coworker set up.
- Continuing building out a home lab.
So, ESX requires Virtual Center to actually build machines. You download Virtual Center with your browser and install it.
Oh, yeah. It requires Windows. Sigh.
So I decided to make a VM for it. Making a Windows 8 VM is a pain because you have to do registry tricks so as not to be presented with swipe panels you can't dismiss. So I decided to make a Windows 7 VM. Straightforward. Except that now I am waiting for 145 Windows Updates to downloads....
Meanwhile, back to building my lab. So, I need to build clients now. Time for two more Ubuntu VMs. Running out of memory, so these will be 2 core/2 GB machines (we'll try that).
And, of course, Linux has its own set of updates....
And the Macs are now wanting to update...
Lots of waiting at times when building labs. More later.
- Starting to pay with an ESX server a coworker set up.
- Continuing building out a home lab.
So, ESX requires Virtual Center to actually build machines. You download Virtual Center with your browser and install it.
Oh, yeah. It requires Windows. Sigh.
So I decided to make a VM for it. Making a Windows 8 VM is a pain because you have to do registry tricks so as not to be presented with swipe panels you can't dismiss. So I decided to make a Windows 7 VM. Straightforward. Except that now I am waiting for 145 Windows Updates to downloads....
Meanwhile, back to building my lab. So, I need to build clients now. Time for two more Ubuntu VMs. Running out of memory, so these will be 2 core/2 GB machines (we'll try that).
And, of course, Linux has its own set of updates....
And the Macs are now wanting to update...
Lots of waiting at times when building labs. More later.
Subscribe to:
Posts (Atom)